
Disaster Planning for Archives: A Practical Plan You Can Actually Use
Disaster planning is one of those topics people know they should tackle, but it keeps slipping down the list because it feels overwhelming, technical, and a little grim. The reality is simpler. A disaster plan is just a set of decisions you make ahead of time so that when something goes wrong, you are not inventing your response while you are stressed, tired, and trying to protect people and collections at the same time.
At Backlog, we walk into many storage rooms that are one small incident away from a bad day. A minor roof leak over the wrong shelf. A pipe that sweats all summer. A basement that has “always been a little damp.” A staff member who is the only person who knows where the shutoffs are. Disaster planning is about turning those vulnerabilities into an actionable plan you can execute.
What a disaster plan actually is
A disaster plan is a plan of action for what your organization will do when an emergency affects your space, your collections, or your ability to operate. It falls within the broader concept of emergency management: the work you do to prevent problems when you can, prepare for those you cannot, respond safely when something happens, and recover in a way that gets the institution back on its feet.
A good plan is not measured by its length. It is measured by whether someone can grab it, skim it fast, and make good decisions under pressure. The best disaster plans are written for real life, not for an accreditation binder.
The four stages that keep you sane
Most emergency management frameworks break disaster planning into four stages: mitigation, preparedness, response, and recovery. It is useful to think of them as stages because it reminds you that most of the work happens before a disaster, not during it.
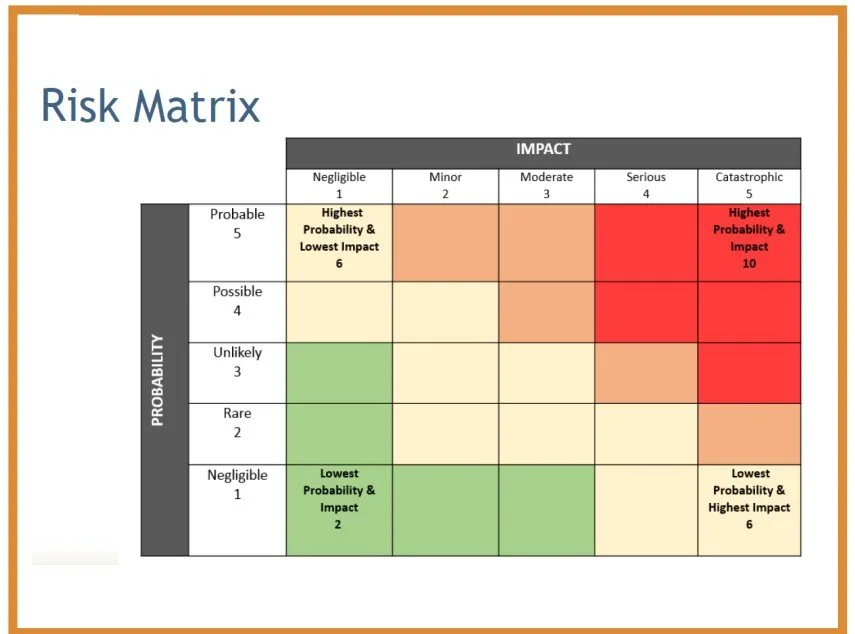
Mitigation and risk analysis is where you identify what could happen and how likely it is. This is the stage that prevents you from wasting energy on low-probability scenarios while ignoring the obvious, like water, HVAC, and building maintenance.
Preparedness is the process of turning risk awareness into a written plan, supplies, roles, and training.
Response is what you do in the first hours and days of an incident, after safety is confirmed.
Recovery is the long tail: document, stabilize, triage, conserve, relocate if needed, and rebuild operations over weeks, months, or longer.
Stage 1: Mitigation and risk analysis
Risk analysis is not about imagining every possible disaster. It is about choosing your top risks based on your location and your building, then ranking them so you can focus. Start with external factors. Are you near open water or in a flood-prone area? Do you get frequent storms? Are wildfires part of your region now? Are you near a fault line? Is the neighborhood high risk for break-ins? Those risks vary by location, and your plan should reflect that.
Then look inward. Internal hazards are often the bigger threat because they are the ones you live with every day. Building maintenance history matters. Leaky pipes, clogged gutters, basements with chronic moisture, aging HVAC systems, unsecured storage shelves, collections stored too close to the floor, and unclear fire protection controls are the kinds of issues that turn a manageable incident into a collection-wide problem. Digital risk belongs here, too. If your inventory lives on a single computer, or your backups are informal, that is a vulnerability, just like a leaky roof.
This stage needs a walk-through. Go to the places you normally avoid. Mechanical rooms, basements, attic spaces, behind storage ranges, closets near bathrooms, the spots where you already know water shows up when it rains. Document what you find and where emergency systems are located. Water shutoffs, electrical panels, fire suppression controls, and alarms should not be a scavenger hunt.
One important discipline here is resisting the temptation to call everything high priority. If everything is urgent, nothing is. Pick three to five critical risks. Address those first. Once you have mitigation steps in place for the biggest risks, then move down the list.
Stage 2: Preparedness
Preparedness is where you write the plan, but it is also where you build the structure that makes the plan usable. If you can do this work with a small committee, do it. Even in a small organization, you can pull in stakeholders for feedback so you are not building a plan that only makes sense to one person. If you can loop in local first responders for even one meeting, it is worth it. Relationships matter during emergencies, and you want to meet people before you need them.
A disaster response plan typically includes a brief introduction and objectives; a supplies section; a response plan with procedures and contacts; salvage priorities and procedures; and a long-term recovery plan with appendices.
The introduction and objectives section should tell someone how to use the plan and when it was last updated. It should also spell out which scenarios the plan addresses and why, based on your risk analysis. The goal is to avoid a plan that remains untouched for five years, only to be out of date.
The supplies section is straightforward but is often executed poorly. Emergency supplies should be set aside, clearly labeled, and kept separate from daily-use materials. Otherwise, the gloves, flashlights, plastic sheeting, and tape will slowly disappear. If you do nothing else, create a dedicated, labeled emergency supply container and make it a rule that it is not used for daily needs.
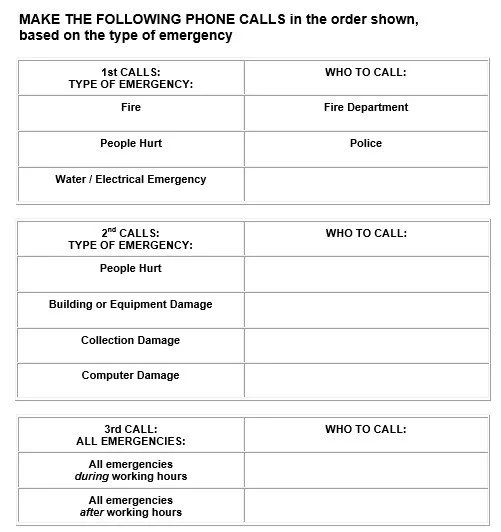
The response plan is the operational core. This is where you define emergency procedures, call lists, roles, and vendors. Procedures should make clear when to evacuate, when to call authorities, and how staff should behave in the first minutes of an incident. Your call list should include more than emergency services. It should include building trades and specialized support such as plumbing, electrical, HVAC, locksmith, security, insurance, and any recovery vendors that handle collections. A plan is stronger when you have proactively contacted these vendors and confirmed they still exist, serve your area, and can still perform the work you need.
Roles are where many plans become realistic. No one can manage an emergency alone. Your plan should designate an emergency commander and an alternate, and clearly assign responsibilities for communicating with vendors and staff and for monitoring safety. The point is not bureaucracy. The point is avoiding chaos when everyone is trying to help at once.
Salvage priorities are the part people avoid because it feels like choosing favorites, but it is also the part that prevents paralysis. When time and space are limited, you need a pre-decided order of operations. One useful anchor is that essential institutional records matter. Payroll, accounts payable, legal documents, and operational records are not glamorous, but if you cannot keep the institution functioning, you will struggle to fund and manage long-term recovery. After continuity needs are addressed, salvage priorities can be based on mission-critical collections, uniqueness, heavy use, legal requirements, vulnerable formats, and materials on loan.
Procedures should focus on stabilization, not perfection. The goal in the early stages of salvage is to prevent secondary damage, such as mold growth, distortion, soot embedding, or loss of control over where items went. The plan should also acknowledge reality. You may need temporary off-site storage, freezer space, or conservation support. If those options are not available locally, the plan should say what you will do instead.
Long-term recovery planning is about answering the uncomfortable questions before you have to. Where will materials go if they need conservation? How will you pay for it? Where will staff work if the building is inaccessible? How will you maintain access to essential systems and records? Appendices can include insurance information and any key documents you want immediately available during a crisis.
Stage 3: Response
Response only begins after safety. If first responders need to clear the site, everything waits. Once the space is safe, the emergency commander assesses the situation, defines the scope, and activates the plan. Documentation starts immediately. Write down what happened, what decisions were made, who was called, what was moved, and where it went. Take photos. Create an incident report that is detailed enough to support insurance, leadership communication, and internal tracking.
The practical goal of the response is to secure and stabilize the records. A small, localized incident might mean moving a few shelves' worth of boxes away from a leak. A major water event might require triage based on salvage priorities and coordination with external support. The plan should reduce the decision load at that moment.
Stage 4: Recovery
Recovery is where adrenaline fades, and the real work starts. It includes the emotional impact on staff, the physical logistics of salvage and relocation, the inventory of damaged and undamaged items, and the long-term rehabilitation of materials and systems. Recovery needs tracking. It is easy to lose intellectual control after a disaster, especially if materials are moved quickly and stored in temporary locations.
Recovery should also include a parallel focus on operational continuity. Reopening and restoring services matters because institutional stability supports collections recovery. Some disasters become moments when communities rally, funders pay attention, and stakeholders finally understand the value of the archives. That does not make the disaster good, but it can create momentum if the institution communicates clearly and acts decisively.
Resources that are worth your time
You do not need to reinvent this work. There are strong, practical resources that support both plan writing and media-specific decision-making.
National Park Service Conserve O Grams are excellent for guidance on handling different material types.
The Emergency Response and Salvage Wheel is useful for quick decision support during the early chaos of an incident.
FEMA risk management resources can help structure your mitigation thinking, and FEMA continuity planning templates can support operations recovery.
NEDCC’s emergency planning guidance is one of the most consistently useful collections-focused resources.
The Getty Conservation Institute’s Building an Emergency Plan is a strong framework for writing and organizing your plan.
SAA and Amigos Library Services offer additional templates and resource lists.
FAIC’s emergency response app can also be useful if you need a quick reference in the moment.
The Backlog version of “start small”
If disaster planning feels overwhelming, start with the smallest meaningful version first. Identify your top three risks. Walk your building with those risks in mind. Write down what you would do in the first 30 minutes of an incident, including who you call and where you shut off water or power. That is not busywork. That is the foundation of a plan that can actually protect your collections and your team.
Want to learn more? Watch our webinar on Disaster Planning here: